Installing a multinode Kubernetes cluster using kubeadm
I have been playing around with Kubernetes in various settings for almost three years. Majority of it in production. Where the infrastructure was either setup and configured by experienced platform engineers, or it was hosted on Google as GKE clusters. My interaction with Kubernetes has been limited to mostly handling the deployments that I work on.
Recently I decided to start learning Kubernetes at a greater depth. So what better place to start than installing and configuring a multi node cluster on my laptop? To be honest, it took me a few attempts to get things working. For that reason I decided to create this blog post documenting the process as a tutorial. If you too are curious about setting up a Kubernetes playground on your laptop or PC, read along.
Before we begin
For this tutorial we are going to install the Kubernetes nodes on VirtualBox virtual machines running Debian Buster. The steps would be slightly different for any other combination of hypervisior and guest operating system.
It is recommended that your system has sufficient memory and CPUs available that can be allocated to the virtual machines. The test cluster should work fine on a computer with a modest Intel Core i5 or AMD Ryzen processor as long as the host has enough free memory to share with the VMs.
Creating the VMs and setting up the network
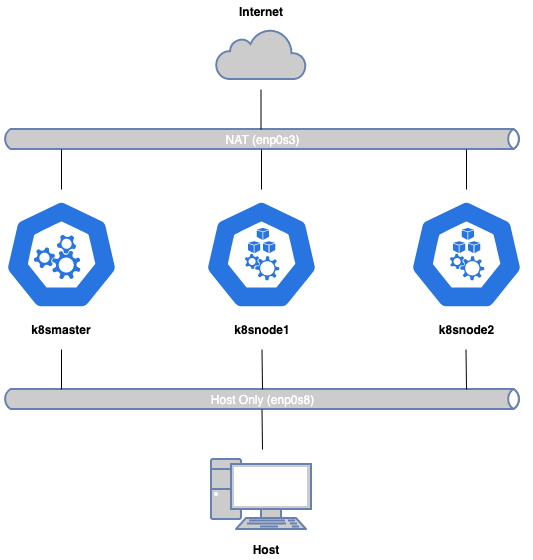
At the end of this tutorial we would like to have a Kubernetes cluster with a single control plane and two workers. That translates to three virtual machines. As for network interfaces: we would want to create a couple of them. First, a NAT adapter for the virtual machines to access the Internet. Second, a Host-Only interface for letting the the VMs communicate amongst each other and the host operating system. The following diagram gives an overview of how we plan to implement our network.
Before you begin make sure that the VBoxManage is accessible from your shell. In case it isn’t, update the PATH variable to include the path to your VirtualBox installation.
Let’s start with creating the virtual machines.
|
|
Each worker node will be allocated 1 cpu, 2 GB memory, and 12 MB video memory. The master will get 2 cpus and the other allocations remain unchanged.
|
|
Next we need to create virtual disks that will be used for secondary storage by our virtual machines. We wil create three dynamic storage disks 10 GB each.
|
|
Before proceeding make sure to download the Debain installation image from here.
Once you have downloaded the image on system, we can go ahead and configure the virtual machines to use the Debian disk image and the newly created virtual hard disk.
|
|
That leaves us only with the network configuration. When you create a new virtual machine on VirtualBox, by default nic1 is configured to use a NAT adapter. You can verify this by running VBoxManage showvminfo <vmname> | grep "NIC 1".
The last step in our setup is to configure the host only interface for internal communication. Before we do so, we need to decide the ip ranges for the network. We can use the IP range 10.10.0.1/16 on this network interface. The master and the two worker vms can be assigned IPs 10.10.0.2, 10.10.0.3, and 10.10.0.4 respectively. We also need to define a subnet for our pods. For which we can use 10.10.128.1/17. This subnet will be required later when we configure the CNI.
|
|
Installing and configuring the operating system
We are now ready to install the operating system on our virtual machines. Fire up the vms with the following commands.
|
|
Select the second option from the list, Install.
Choose your preferred language and location settings.
In the next screen you’ll be asked to select your preferred network interface. Select enp0s3. This will give the installer access to the internet for pulling the missing packages.
For the host names, let’s assign them k8smaster, k8snode1, and k8snode2 respectively. We can put all the VMs in a domain named kubernetest.
After setting the root password. The installer will ask you to create a new user. We will be using this new user to SSH into the nodes.
Next you’ll be asked to configure your storage medium, and specify a mount point the file system. Either you can select the guided option or you can manually create a partition for the file system. In case you do it manually, do not create a swap partition. This would anyway need to be turned off before we can bootstrap Kubernetes. However, if you select the guided mode don’t worry we can turn off swap usage later.
In the software selection page, select only SSH server and Standard system utilities. We do not need a desktop environment for any of the virtual machines.
Once the installation completes you’ll be asked to confirm the master boot record. Select /dev/sda from the list and complete installation.
Configuring the operating system
Congratulations! You have successfully installed Debian on all three virtual machines. Login to the machines with root credentials to install a few utilities that will be required to complete the setup.
|
|
We are left with making the machines acquire IPs on the host only interface. For this we will have to make the following entries to /etc/network/interfaces.
|
|
You can now restart your networking services and verify the changes using ifconfig.
|
|
That completes the setup of the environment. We can now focus on installing Docker and Kubernetes. You can now reboot all three virtual machines and login into them using SSH from your host terminal.
Installing Docker and Kubernetes
We will be installing both pieces of software from their official repositories.
|
|
Bootstrapping the cluster
Now our virtual machines are ready to be bootstrapped with kubeadm. First, we need to set up the control plane on the k8smaster virtual machine. Then we will make the other two vms join the cluster as workers.
In case you have not disabled swap already, you can do it now with the following command.
|
|
We will execute kubeadm init to create the control plane on the k8smaster after which we shall install calico as our CNI.
|
|
Copy the admin.conf file to your home directory as shown in the output above. Make a note of the token and the certificate hash displayed by the above command. We will need those to make the other virtual machines join the cluster. But before we do that, let’s install our CNI.
We will download the manifest file from the official website of calico and then make changes to it in order to include our new network settings.
|
|
Modify the value of CALICO_IPV4POOL_CIDR to 10.10.128.1/17. Once done save the file and apply the manifest.
|
|
You can now switch to the other two virtual machines and run the following command to join the cluster. (Turn off swap in the other VMs if you have not done it already)
|
|
Making our first deployment
Now we are ready to make our first deployment on our cluster.
|
|
And that’s it. You have successfully deployed your first application on a Kubernetes cluster that you created from scratch.
That concludes the tutorial. I plan to write more blog posts on Kubernetes and other container orchestration tools as I progress on this journey.